You know how it’s pretty easy to spot an online post or comment that was written with
ChatGPT? It’s not that they use em-dashes—plenty of great writers use
em-dashes—it’s that they have a general air of disconnectedness and they write with a
patronizing, prescriptive structure. It’s easy to spot most AI slop.
However, I am cognizant of survivorship bias. There is a lot of AI-generated content
that slips by unnoticed. If you have a strong command of both your subject matter and
written prose you can prompt your way to a high-quality output, but in order to do
that you have to give it more than it gives back. It’s a lopsided, toxic relationship,
and these days there are a lot of lovesick people out there.
Unfortunately, your boss is one of those sad saps standing on the curb with nothing
but a bouquet of flowers and a dream.
In my mind there are three different types of tasks that we might get a Generative AI
tool or “Agent” to do for
us:
-
There is little disagreement that Generative AI is bad at anything that might
loosely be described as art, which I’ll define for myself as anything unique that is
created with a mixture of curiosity, imagination and craftsmanship.
-
Generative AI is great at tasks and processes that require no imagination, like
extracting structured data from written text, summarizing a transcript, or
repetitive clerical tasks.
-
Generative AI might be good at domains like programming or law, which can
span a massive spectrum between the utterly routine and the very incarnation of
elegance.
The third category is the most interesting to me. There are wildly divergent opinions
on the utility (or futility) of Generative AI for programming. The world of bits and
bytes can be intractable because what you build is limited only by the guardrails of
your imagination. The substrate is what you decide it is. The raw materials are
undefined until you declare them.
In the physical world of atoms, we have a general idea of the forces, chemicals and
components that we need to build a bench, a bridge or an airplane. That isn’t to
discount the expertise required to build those things, I note only that there is an
inherent tactile structure to building things in physical space that doesn’t exist in
the digital one. Things fit together, or they don’t. Most failure modes are known in
advance, unlike the sly bugs that lie in wait within every digital codebase.
Because it is not grounded in the physical world, software complexity fits a
fat-tailed distribution. A lot of applications follow the tried and true recipe of
reading and writing information to a database with a bit of business logic and
reporting mixed in. The techniques for creating such an application are well
documented and well understood, and this is the sort of thing that Generative AI can
do very well with little correction or oversight on the part of the operator. For this
reason, prototyping greenfield projects is a great use of the technology.
As we navigate further to the right on our fat-tailed distribution of software
complexity, we quickly enter a different world. Any piece of software is comprised of
layers—each layer building upon the layer below it, disconnected from and naive to the
specific implementation details underpinning it. This is called abstraction and it’s a
foundational concept in programming. In simple software we might be coding at just one
layer of abstraction above a well-documented framework that the Generative AI is
pre-trained on. But in complex and/or mature software, we’ve already written a few
layers of our own, and the AI hasn’t been trained on the building blocks we’re asking
it to use.
I believe most of the disparity in lived experience with Generative AI among software
developers can be explained by plotting their work on this approximate log-normal
(fat-tailed) distribution. I suspect this shape holds true in many other professional
domains as well.
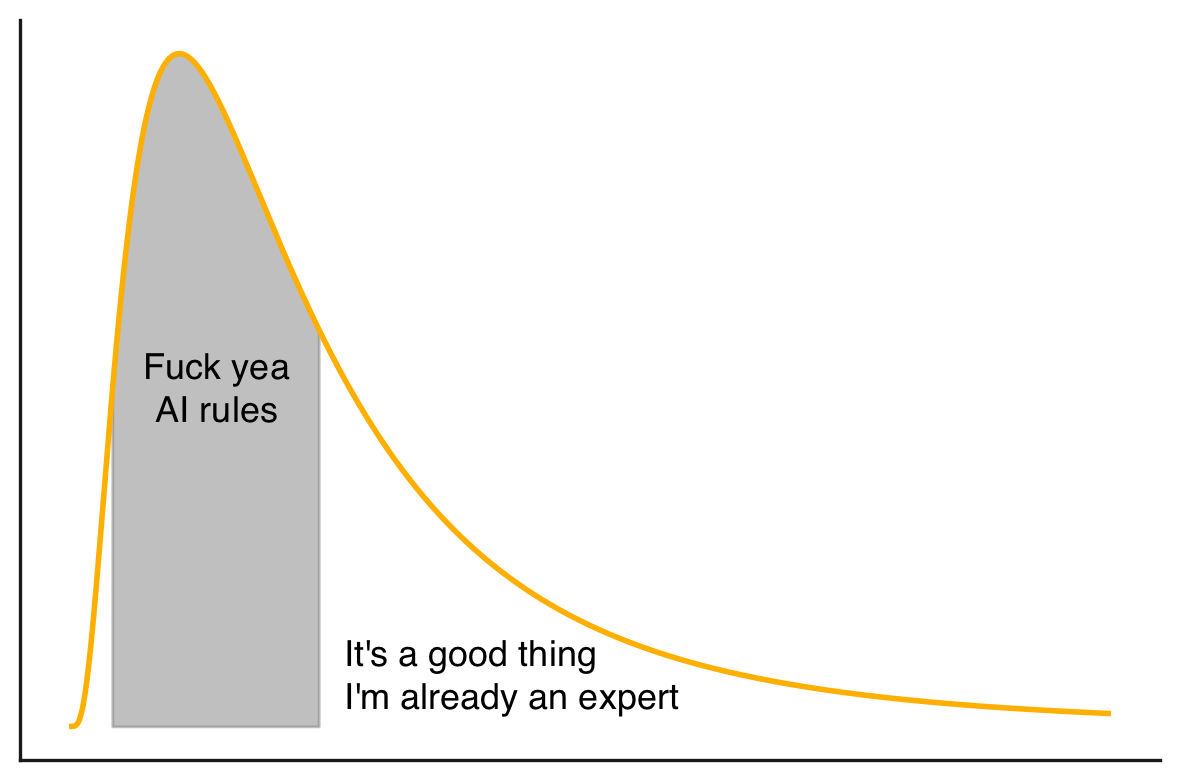
Complexity extends rightward. Most AI evangelists either have misaligned incentives or
work on simple projects (denoted by the gray-shaded area).
It is possible to get a modern Generative AI to work on complex projects in the tail
part of the graph, but it needs much more attention and guidance. That is, the
operator needs to know both the subject area extremely well, and the nuances
of the Generative AI tool extremely well. Obtaining a positive outcome at this end of
the chart is a difficult skill to master in itself, with novel risks and pitfalls. In
many instances it is faster and less error prone to write the code yourself, since you
will need to step in and course correct the AI a lot. There is ample value in
certainty, and you forego that at the outset. If you don’t have the expertise to
identify its missteps (and there will be many), then you are firmly out over your
skis. You can see how frustrating this is for everyone involved in real time: take a
look at
Microsoft’s own engineers losing their minds trying to get AI to write correct code
for them
(also here,
here and
here).
Your boss has been sold a grand lie. It’s not their fault. They have been set adrift
in a sea of misdirection, misaligned incentives, grift, absolutism, desperation, and
stupidity. I have never seen a manic hype cycle like this one and neither have they.
ChatGPT came along just as 15 years of free money dried up, leaving an overweight tech
industry clamoring for something, anything to keep the capital spigot flowing. Not
only could Generative AI create an entirely new class of products and start-ups, it
could also be used as cover to lower headcounts and put those pesky, overpaid software
developers back in their place.
So the salespeople started buying seafood towers and the scrum masters scrummed with
renewed vigor, and every downstream middle-manager through C-suite executive were
convinced that they didn’t just want AI… they needed AI. There’s an AI button
on your keyboard now. notepad.exe has Copilot built in. There’s no budget
for anything without AI. If you don’t use AI, don’t bother showing up on Monday.
To state the quiet part out loud, the promise of Generative AI is “efficiency”, and
“efficiency” simply means doing the same amount of work with fewer people. So if you
came to this post wondering if your job is at risk, the answer is probably yes, but
not because of AI—because your boss has been pumped full of hot air.
Your boss has been told that an AI “Agent” is equivalent to a person. That you can set
it on a task, and with enough iterations of the loop, it will arrive at the correct
solution/feature/output. They’ve been told that their competitors have many such tools
and “Agents”. They’ve been told they’re falling behind. They can’t know it for sure,
and they can’t dispel it, but everyone is saying it, including their own boss, and
their boss’s boss, and those well-dressed chaps on that panel last week. It’s not your
boss’s fault, they just have to to keep up with <dastardly competitor>, who no
doubt is using
Workday: the powerful AI platform that keeps your most important assets on track,
every decision on point, and your fleet of AI agents at peak performance. That’s
Workday.©
Jesus Christ.
The reality is this:
in order to apply Generative AI to a task, there needs to be a human operator in
the loop who understands that task BETTER than the AI. The classic adage of “garbage in; garbage out” applies. You cannot take someone who
lives on the median of the distribution in the chart above, give them a replit
account, and expect top-tier output.
The upper bound on what your company can accomplish with Generative AI is the level of
your most proficient colleague. It is as true in 2025 as it was in 2020 as it was in
1820: you cannot do great things without great people. What you can now
accomplish are more middling things with the same amount of great people. That has
business value, to be sure. There is plenty of middling work that needs to be done.
Now, I have no empirical basis for these numbers aside from my own experience and
intuition, but if I’m being VERY generous I would peg my own efficiency improvements
using Generative AI at somewhere around 20% to 30% on average. On prototyping and side
projects, I’d guess that I’m approaching 100%, but that’s not real work. On my mature
main project and its components, the improvement is well below 10%. Your mileage may
vary depending on your mix, but it’s not a human ass in a human seat, that much is
true. I would estimate that an AI-forward company could drop a single junior developer
for every 3 or 4 senior developers, which would be on the order of a 10% to 15%
reduction in compensation expense in the base case of a company with only 4 or 5
employees, all but one of them senior. The savings would be well below 10% in a
larger, more balanced pool.
How might you protect yourself from the whims of your stupid, gullible boss who hasn’t
been enlightened by my napkin math? This hype cycle will crash in due time as they all
do, but Generative AI isn’t going to uninvent itself. Our environment has indeed
changed, so it’s time to adapt.
If my assertions prove correct, it will be the mundane work that ultimately gets
carved out and handed off to an AI under the supervision of an
overqualified operator. This runs counter to the current narrative that you
can have average people accomplish above-average things with AI, but I don’t think
that’s how it will shake out (much to the chagrin of MBA consultants everywhere,
themselves rather average).
If you’re already in that “skilled operator” category and using Generative AI to
expedite your more menial work, continue advancing your ability to use the tools but
remember not to let your basic skills atrophy. I can say my spelling is far worse now
with the ubiquity of spell-check than it was in grade school. Likewise, how many
people can still parallel park under pressure without a backup camera, or navigate
across town without GPS navigation? Take your cue from the aviation industry where
pilots regularly fly manually despite auto-pilot to keep their skills up.
If you’re starting out, that’s a trickier spot to be in, but it’s not impossible. Lean
into fundamentals and keep your pencil sharp, because there will always be a place for
the person who actually understands the code that is deployed, and that will only
amplify in the future. Your colleagues or classmates are all learning to ride a
motorcycle before they know how to pedal a bicycle. Learn how to pedal the bike.
I stated early on that art is safe. I believe that will always be true because art is
how we express humanity. It is the antithesis of machine. There may be no artistry
apparent in your day job, but curiosity, craftsmanship and imagination are the
ingredients of mastery no matter what you do. An AI agent cannot replicate your taste.
It has none of your flourish or flair. It has no style. It is not cool.
If you’re a programmer, recognize that programming is design. If you’re a labourer,
approach your job like an engineer. If you’re an engineer, approach your job like an
architect. Carve your name into your work and you’ll be alright.